Basics of Ubuntu Operating System
Log in to the computer
After turning on the computer you will be asked for a username and password. There is only one user of the computer at the moment. That user is programmer. The corresponding password was given to you when you borrowed the computer.
Using the terminal
Open the terminal window. It can be found by searching for applications installed on the computer. First click the Ubuntu icon at the bottom-left corner of the screen. Search for "Terminal," and press Enter.
Commands pwd and ls
The basic file structure organizes the data into folders and files in a way that most operating systems do. The command pwd (followed by Enter) outputs the current directory you are located in. The command ls outputs the list of files in the folder you are currently in. Notice that a Unix system is case-sensitive, so you may not type LS or Ls instead of ls.
You are currently located in the folder /home/programmer. A responsible usage of a computer consists of storing your files in this folder only. You do have full administrative permissions over the computer, but you are highly advised to limit your actions to within this folder unless you are installing new programs or libraries.
Commands mkdir and cd
The command
mkdir myFirstFolder
creates a folder myFirstFolder within /home/programmer. You can now enter it with the command cd myFirstFolder. By running the command pwd now you will receive the output
/home/programmer/myFirstFolder
Editor nano
We will now create our first text file. Execute the command
nano myFirstText.txt
This command will result in something that seems as if terminal window is cleared. In fact, a text editor nano is opened and you may use it to create the first file. Type the following text
This is my first text document created using the editor nano.
Press Ctrl and x at the same time. You will be asked whether you want to save, and you should answer by typing y. The editor will ask you to confirm that the modifications should be written to myFirstText.txt and you should press Enter.
You have now exited the editor nano and the file myFirstText.txt is being created. You can see the proof of your activity by typing
ls -l
To see the content of myFirstText.txt printed on the screen, type cat myFirstText.txt. If you want to further edit the file, type nano myFirstText.txt.
A nice introduction and the list of basic terminal commands is located at the link
https://help.ubuntu.com/community/UsingTheTerminal
Set up the wireless connection
Click on the settings icon from the main menu in the bottom-left corner.
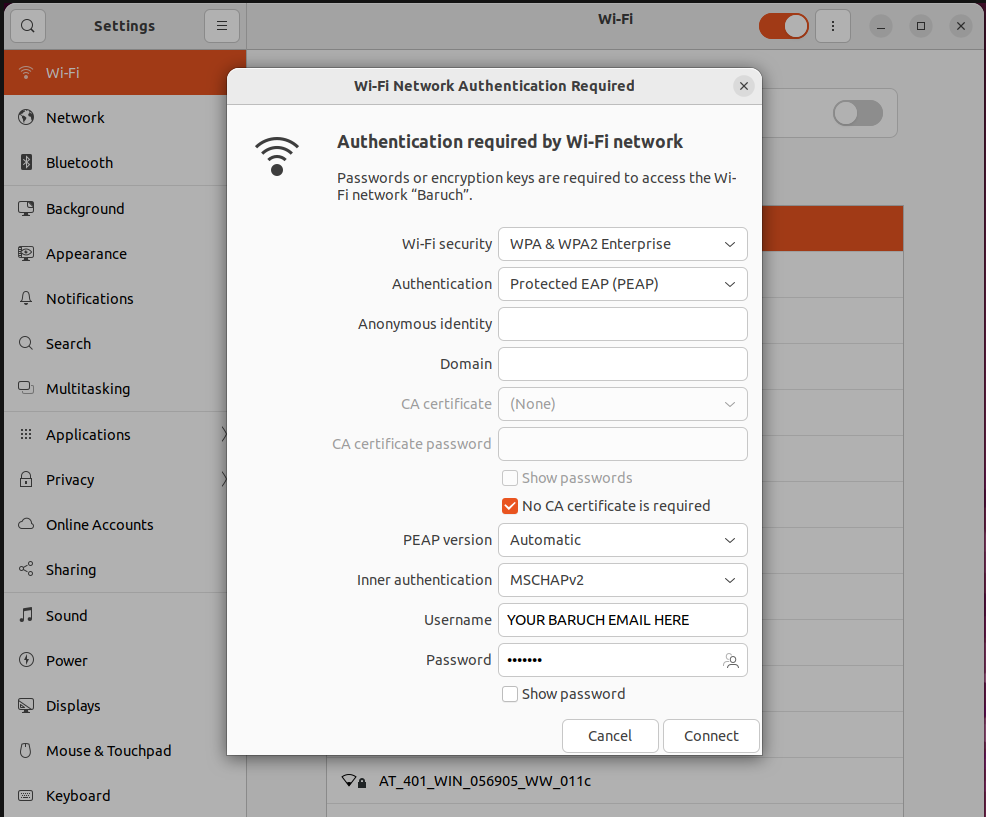
The Wi-Fi section in the left column should be selected. Choose Baruch and fill it as shown in the picture below. Note: the default options are not correct and you have to choose the correct options from each of the drop-down menus. Replace "username" and "password" with your username and password that you use to access wireless on campus (Your username is your college email that looks like First.Last@baruchmail.cuny.edu).
If you receive an error message while setting up wireless account, you may want to restart the wireless. Wireless can be restarted from terminal using the commands
sudo nmcli networking off
sudo nmcli networking on
You will be asked for the computer password (not Baruch wifi password).
Creating a username for yourself
Open the terminal window. Type the following commands in the terminal, replacing the word bart by a username you would like for yourself.
sudo adduser bart
Since you (acting under the account name programmer) have issued a sudo command, the operating system will ask for password. Please provide the password for the account name programmer.
After your password is accepted, you will be granted the privilege of running the command adduser. You are now asked to enter the password for this new user (whose name is bart in our example). Make sure you do not forget this password. If you plan on forgetting it, make sure that you know how to reinstall the operating system Ubuntu 22.04.
The rest of the process is obvious.
Granting sudo privileges to the newly created user
Unlike the user programmer, this newly created user bart does not have abilities to perform administrative duties and enjoy administrative privileges on this computer. In order to grant the administrative privileges to bart, or your username, we need to type
sudo usermod -a -G sudo bart
You may want to verify whether the new user is successfully granted administrative rights. To do so, type the following
getent group sudo
The output should list the names of all users who are members of the sudo group, i.e. the users who have the ability to perform administrator roles. By now, they should be programmer and bart.
You can now close the terminal by typing the command
exit
Assuming the role of the new user
Since our next task is to delete the user programmer, we need to shutdown the computer and log into it as a different user, bart in this example. To shut down the computer, first click on the right-most icon located in the top menu of the computer screen, then select the appropriate option.
Turn on the computer. When you reach the log in screen this time, you need to choose the correct user to log in as. You will have to reconnect to the wifi in the same way you did the first time.
Assuming you have now logged in as bart, open the terminal window. The instructions are listed above.
Delete the user programmer and all the files that the user has created by executing the following two commands
sudo deluser programmer
sudo rm -r /home/programmer/
Writing the first C++ program
We first need to install the c++ compiler. Open the terminal and execute the following two commands:
sudo apt update
sudo apt upgrade
You need to restart the computer now. After the restart, type the following command:
sudo apt install build-essential
Now you have a very capable C++ compiler. The compiler is run from the command line in the terminal window. Our first program is a rather simple one, and we will type it using the editor nano. Later we will install the editor Microsoft Visual Studio Code, which will allow for a more pleasant experience.
Open the terminal window, and enter the folder /home/bart/, where bart is replaced by your username.
cd /home/bart/
Create a folder that will contain our first programming assignment. The name of the folder will be program001.
mkdir program001
Enter the folder program001.
cd /home/bart/program001/
Writing the first program
The next line creates the first program hello.cpp. Type
nano hello.cpp
Inside the editor type the following C++ code:
#include<iostream>
int main(){
   std::cout<<"Hello World!"<<std::endl;
   return 0;
}
Press Ctrl and x at the same time. Press y and then Enter to confirm.
Now you are back in the main session of the terminal. Type the following command to invoke the compiler
c++ -o helloWorldProgram hello.cpp
Provided that there were no errors, a file helloWorldProgram is created and you can execute it by typing
./helloWorldProgram
Installation of Microsoft Visual Studio Code
The installation is done with a single command in the terminal window
sudo snap install --classic code
Microsoft Visual Studio Code is a text editor that provides a much better environment than nano. Click on the Ubuntu icon and search for newly installed application. Once the application is running you may scroll over to the top of the screen and see the main menu. Select open file and find the file hello.cpp that you may now edit in a much better environment.